Increase Video Resolution from 480p, 720p to 1080p, 4K Even 8K without Losing Quality
"Is it possible to increase video resolution when converting previously shot footage?" - John
Are you looking for an efficient way to increase video resolution from SD (480p), 720p to 1080p or 4K, even up to 8K ? If you want to increase video resolution without losing quality, you just come to the right place.
In this article, we will talk about how to use the best video quality enhancer - AVCLabs Video Enhancer AI to improve low resolution videos by upscaling any low resolution videos from 480p, 720p to 1080p or 4K, even up to 8K.
When it comes to video content, high resolution means just that: high quality. Video resolution is the measurement of image clarity and detail. In other words, it’s how detailed and clear the images are in your video files. High resolution video has greater detail and is much larger in size than standard resolution. Read on to learn more about video resolution, pros and cons of various resolutions, and tips for what types of video content should be captured at different resolutions so that you can optimize video resolution without sacrificing quality!
 Part 1: What Are the Different Video Resolution Standards
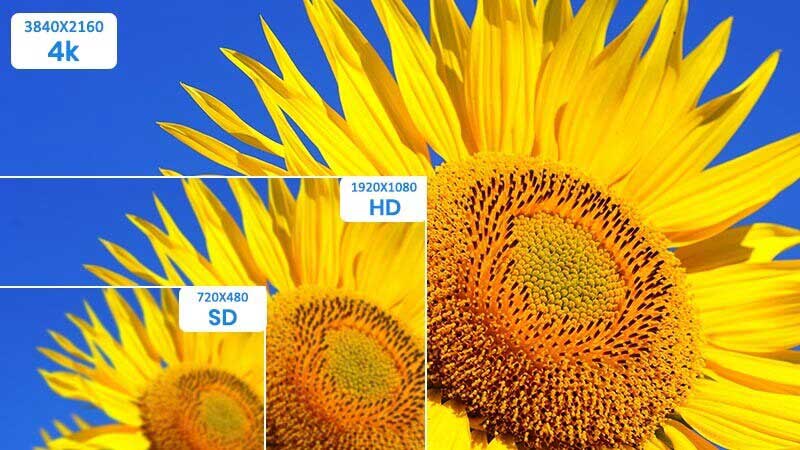
When it comes to digital video, a resolution standard is determined by the number of pixels (small squares of digital information) that are displayed on the width of a computer monitor or a display device. The most common numbers for video resolution are 720p, 1080p, 4K, 8K. But what do these numbers actually mean? Let's see instructions below.
• 720 resolution (HD)
720p = 1280 x 720 - is usually known as HD or "HD Ready" resolution. It still can be an acceptable resolution for smaller web content.
• 1080 resolution (full HD)
1080p = 1920 x 1080 - is usually known as FHD or "Full HD" resolution. It has become the industry standard for a crisp HD digital video that doesn’t break your storage space. This is also a common screen resolution for smartphones.
• 2K resolution or QHD (quad high definition)
The next steps up are QHD (2560 x 1440 pixels) or 2K resolution (2048 x 1080 pixels). These formats provide more room for image edits, larger displays and reframing without lost quality.
• 4K resolution (ultra HD)
3840 x 2160 pixels (4K UHD), or 4096 x 2160 pixels (DCI 4K), is a very large display resolution and it's found on high-end TVs and monitors.
• 8K resolution
8K = 7680 x 4320 - is known as 8K. It offers 16 times more pixels than the regular 1080p FHD or "Full HD" resolution.
 Part 2: How to Increase Video Resolution without Losing Quality
As an AI-based video upscaling software and detail-preserving video upscaling tool, AVCLabs Video Enhancer AI is aimed to upscale low-resolution and blurry videos from 480p, 720p to 1080p, 4K, even up to 8k in a smart way. Through the use of powerful algorithms, it increases the video resolution with detail gathered from multiple frames. In addition, it helps users to improve low-res video's quality by fixing grainy video, removing video blur and adjusting video brightness, contrast, contrast, and sharpness in an ideal balance. No advanced video editing skills are needed.
Video Enhancer AI
- Enhance the video quality to make them more aesthetically pleasing.
- Upscale videos from SD to HD, HD to 4K.
- Sharpen faces from blurry video and enhance facial details.
- Support denoising and deinterlacing videos as well as cropping videos to fill frame.
- Support GPU & TensorRT acceleration.
Upscale Low Resolution Videos from 480p, 720p to 1080p, 4K, 8K Using AVCLabs Video Enhancer AI
Install and Launch AVCLabs Video Enhancer AI
Warm reminder: Before increasing low-resolution videos from 480p, 720p to 1080p, 4K, 8K, you can click here to check whether your CPU or GPU is capable of upscaling videos with AI.
Download AVCLabs Video Enhancer AI from the link given above and then simply launch it after it has been installed on your computer.

Import A Low-res Video, Select the AI Model and Set the Output Parameters
Drag and drop a low-resolution or low-quality video to the program, then you need to modify some critical parameters like AI model, output resolution, output format, output path, brightness, contrast, contrast, and sharpness.
Note: AVCLabs Video Enhancer AI supports the most normal video formats like 3G2, 3GP, AVI, DIVX, FLV, F4V, M2TS, MTS, MOV, MP4, M4V, MKV, etc.
Just choose the AI Enhancement feature under the Feature List from the right panel of the program. And then click the dropdown list of Video-Out to adjust the output size to 200%, 400%, SD, HD, 4K UHD, 4K, and 8K, and set the output frame rate if you want to change it.
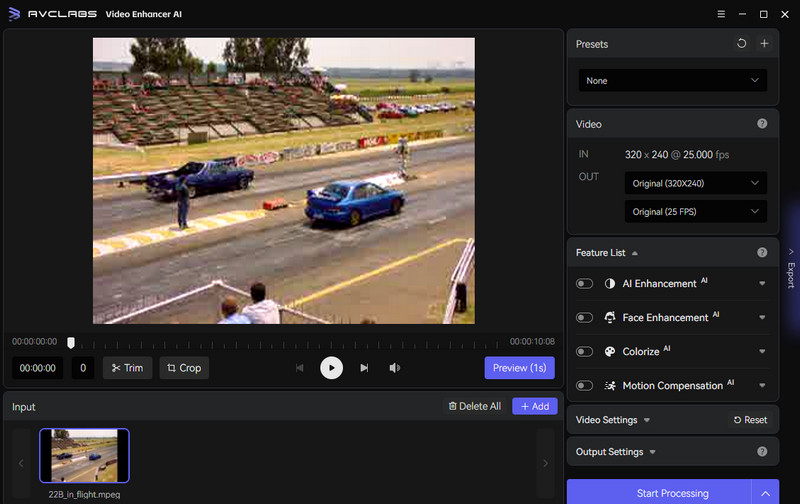
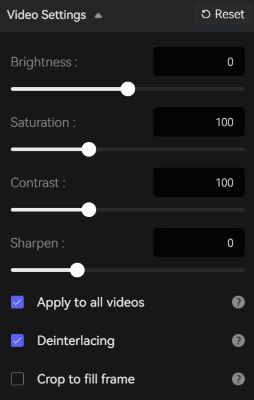
You can also unfold the Video Settings to adjust the Brightness, Saturation , Contrast, and Sharpness.
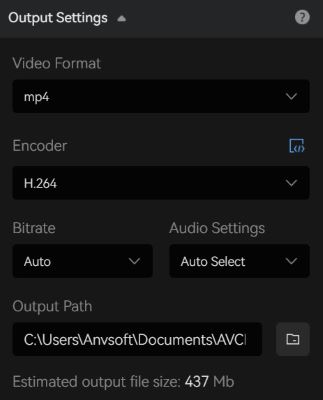
And navigate to the Output Settings part to set the output video format (MKV, MP4, AVI, MOV, WEBM), the encoder (H.264, H.265, VP9 Good, VP9 Best, AV1), the bitrate, audio settings, and output path.
Trim the Output Video
You are allowed to trim the unwanted parts frame by frame to save processing time before increasing the video resolution. At the bottom of the program, you can trim your video to the desired length by dragging the slider bar. Or input the start and end of the frames to set a clipping point accurately.

Configure the Performance Settings
Click on the  button and select the Settings option, a settings dialogue pops up where you can change the Performance Settings.
On the Performance Settings, you can choose the AI Processor to determine what hardware (GPU or CPU) will be used by the application when processing, and Max memory consumption to Lowest, Low, Medium, High, and Highest. Highest is recommended if you close any other programs on your computer.

Start Upscaling Video Resolution
Once all the preparation work is done, click the Start Processing button to upscale the low-res videos automatically. The final processing time depends on your computer’s system configuration, video size. Please be patient.
Warm tips: You are able to click on the Pause button to pause the upscaling process if the computer needs to be occupied for other tasks, and you can resume it when the computer is available.
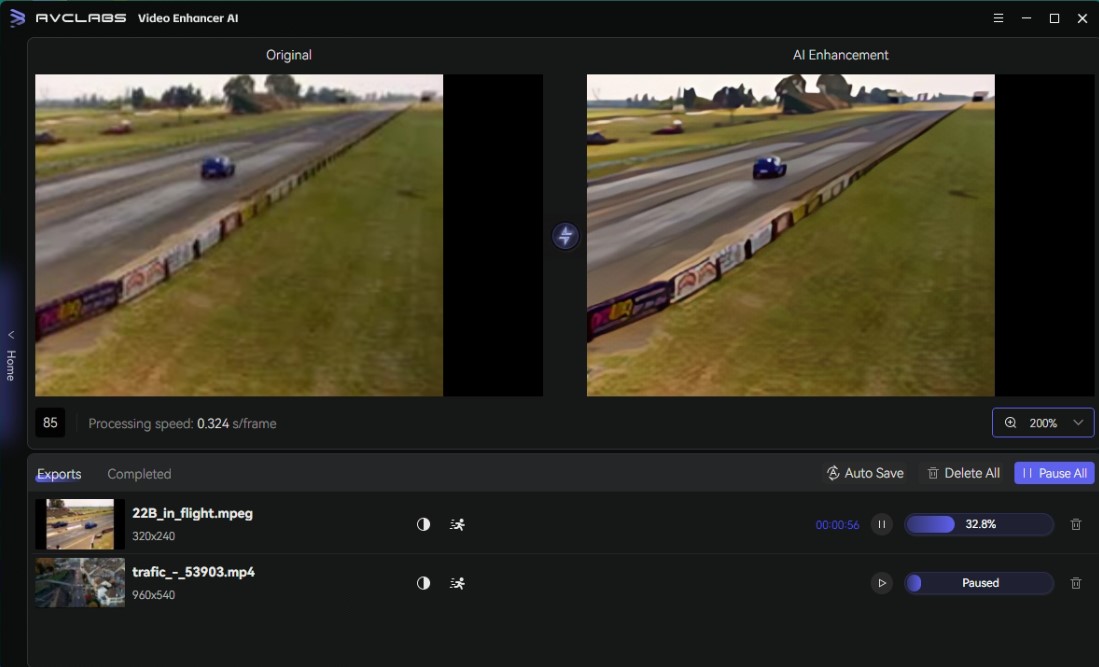
After the AI video upscaling process is completed, just open the file folder to check and enjoy the upscaled high-resolution video.
 Part 3: FAQs about Increasing Video Resolution
Here we are going to talk about the most frequently asked questions about video resolution.
Q1. Which Resolution Should You Use
The best way to determine which resolution you should use is to consider your content and who you’re sharing it with. If you’re creating content for social media, standard definition resolutions like 480p and 720p will be more than enough. If you’re planning on uploading your videos to YouTube, then you’ll need to shoot in high definition.
Q2. Video Resolution and File Size
The more pixels in your video, the larger the file size will be. This means that a high-resolution video file will take up more space on your computer than a standard-definition file would. Most computers come with enough storage to store many high-quality video files. But if you’re creating videos for commercial purposes or have tons of video footage, you may need to invest in additional storage. If you’re shooting video on your computer, the resolution of your screen will affect the size of your video footage. For instance, if you’re editing video on a 1080p monitor, your video footage will be captured at that resolution. But if you’re editing on a 4K monitor, your footage will be captured at 4K. This will result in larger video files, which may consume more space on your hard drive.
Q3.Tips for Improving Video Quality and Resolution
When it comes to video, you won’t always be able to control the lighting of the scene. However, there are ways to make your video look better when you can’t control the lighting. You can increase the shutter speed to reduce motion blur, or you can use a tripod to eliminate unwanted movement. If you’re shooting indoors, you can use artificial light sources to improve the look of your video.
Conclusion:
That's all. As you can see, you can use AVCLabs Video Enhancer AI to upscale your low quality video like 480p into at least 720p or 1080p, 4K, even up to 8K with ease. Hopefully this article will help you.
Try AVCLabs Video Enhancer AI to breathe new life into your footage!
Related Articles & Tips
- • How to Increase Video Quality-Beginner, Professional, Online
- • Old Movie Restoration: How to Upscale Old Movies to 4K
- • TikTok Video Quality Enhancer | How to Make TikTok Videos Clearer
- • 4K Video Converter | How to Convert Videos to 4K for Free
- • 4K Upscaling | Upscale Videos from SD to 4K
- • Best 5 Video Quality Enhancers Online to Improve Video Quality Online
- • Top 6 Best Free Video Editing Software with No Watermark
- • 5 Best AI Video Enhancer Software
- • How to Restore Old Home Movies to HD
- • 4K Upscaling | Turn Old Videos into Crispy 4K
- • How to Easily AI Upscale Videos from 1080p to 4K
 Video Converter
- MP4 Converters
- MKV to MP4 Converters
- AVI To MP4 Converters
- MOV to MP4 Converter
- Best Free AV1 Converters
- HEVC/H.265 Converter
- H.264 Video Converter
- Android Video Converter
- Samsung Video Converter
- Sony PS4 Video Converter
- Nokia Video Converter
- MPEG Video Converter
- Convert 4K to 1080P
- Convert MP4 to MP3
- Convert M2TS to MP4
- Convert MVI to MP4
- Convert WebM to MP4
- Convert Videos to MP3
- Convert MP4 to 3GP
- Convert M4V to MP4
 DVD Converter
 Video Editor
- Best AI Video Editors
- Free AI Video Generators
- Best AI Slideshow Makers
- Replace Face in Video
- AI Cartoon Video Generators
- Text-to-Video AI Generators
- Best Free Voice Changers
- Text-to-Video AI Generators
- Sites to Download Subtitles
- Add Subtitles to Video
- Free Online Video Compressor
- Convert Your Videos to GIFs
- Blur Video Backgrounds
- Video Editing Apps for YouTube
 Video Enhancer
- Best 10 Video Enhancer
- Improve Video Quality
- Fix Blurry Videos
- Remove Noise from Footage
- Upscale Video from HD to 4K
- Upscale Video from 480P to 1080P
- Best AI Video Upscaling Tools
- Make a Blurry Video Clear
- Best Old Video Restorer
- How to Sharpen Video
- Fix Bad Quality Videos
- Increase Video Resolution
- Convert Videos to 4K
- Upscale Anime Videos to 4K
 Photo Enhancer
- Fix Blurry Pictures Online
- Make Blurrys Picture Clear
- Increase Image Resolution Online
- Remove Blur from Images
- AI Image Sharpener Online
- Topaz Gigapixel AI Alternatives
- Fix Low-resolution Photos
- Colorize Historical Photos
- Remove Noise from Photos
- AI Image Sharpener
- AI Face Retoucher
- AI Image Enlargers
 Mobile & PC


