How to Fix Bad Quality Videos?
Poor video quality is not only frustrating, but it can also limit productivity and keep your team from reaching their goals. Dealing with the bad quality videos is quite annoying. But don’t worry. This article will show you how to fix bad quality videos such as blurry, shaky, grainy, pixelated videos and make them crisp, sharp, and clear. Now, let's get started.

 Part 1: Common Video Quality Related Issues
Before talking about how to fix poor video quality, we’ll introduce some common video quality issues first. Read on and learn about the various issues related to video quality we touched on what can lead to a bad quality video.
1. Blurry Videos
Video blur may occur during recording or when you save the videos on a computer or other storage media. If the videos are originally recorded blurry, it is mostly due to shaking of the camera, high ISO, shallow depth of field, wrong focus set up, etc. Whereas videos stored on any drive can get blurry due to corruption, which may happen due to virus infection, improper file transfer or download, etc.
2. Shaky Videos
Shaky videos are very poor and look unprofessional, unpolished. It is difficult and frustrating to watch sharky videos, especially when watching them on larger screens. So, it’s very necessary to fix bad quality videos as soon as possible.
3. Grainy & Pixelated Video
Pixelation usually happens when you compress the data in video files to make the video files smaller and reduce memory usage. Grainy video is a very common and annoying issue as it spoils the video seeing experience. Luckily, removing grain and noise from the videos is very easy.
 Part 2: Fix the Bad Video Quality with Video Enhancer AI
No matter whatever the reason behind the bad video quality issues, you can easily repair poor quality videos by using the video enhancement tool. There are many third-party tools like Video Enhancer AI, Adobe Premiere Pro, Adobe After Effects on the market that can help users to improve the video quality with ease. AVCLabs Video Enhancer AI stands out among these programs.
As a professional AI-based video enhancement tool, AVCLabs Video Enhancer AI is designed to upscale low-res videos to 4K, even 8K and enhance old poor quality videos to better quality with true details and motion consistency kept. All video blur and video noise will be removed automatically and intelligently based on AI technologies. With an intuitive interface and an easily navigable layout, it is a perfect choice for beginners.
Video Enhancer AI
- Enhance the video quality to make them more aesthetically pleasing.
- Deblur your footage by using machine learning.
- Upscale videos from SD to HD, HD to 4K.
- Upscale low-res videos onto a larger screen.
- Trim your footage frame by frame.
Let's take a look at the following tips on how to troubleshoot video quality issues.
Install and Run AVCLabs Video Enhancer AI
Warm tips: you can click here to check whether your CPU or GPU is capable of upscaling video with AI.
Firstly download the AVCLabs Video Enhancer AI from the above button and install it on your Windows PC or Mac computer. Launch it and then you will enter the main interface of AVCLabs Video Enhancer AI.

Import Video
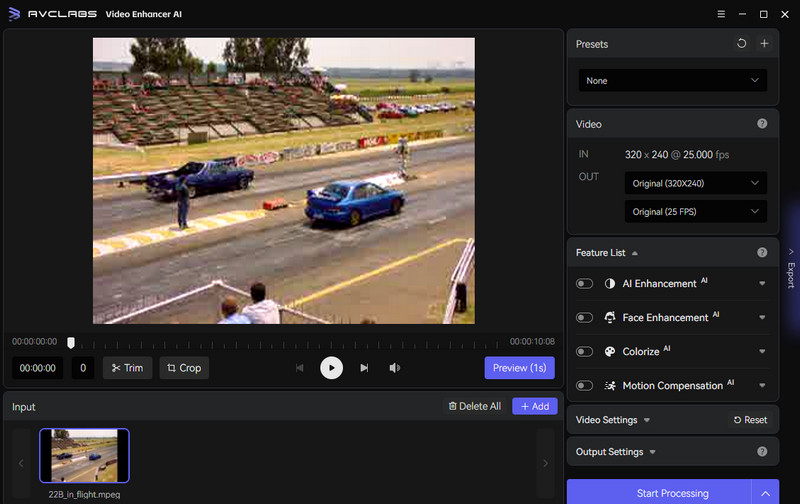
Simply click on the "Browse" button at the bottom of the program interface and select a video file from the computer to import. You can also directly drag & drop the video from your computer to the main window.
Select the AI Model
Browse the feature list: AI Enhancement, Face Enhancement, Colorization, and Motion Compensation. Just turn on AI Enhancement, then you can choose a specific AI Model.
To retouch and beautify the face in the video, you are able to turn on Face Enhancement to detect and enhance every detail to make your subject look great.
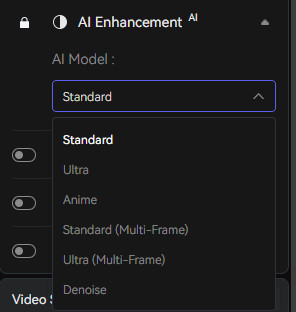
You can also unfold the Video-Out menu and adjust the output to 200%, 400%, SD, HD, 4K UHD, 4K, and 8K. It also gives you options to change the frame rate.

Before enhancing the video quality, you can go to Video Settings to adjust the video brightness, contrast, saturation, and sharpness. Set the output preference in Output Settings.
Start Improving Video
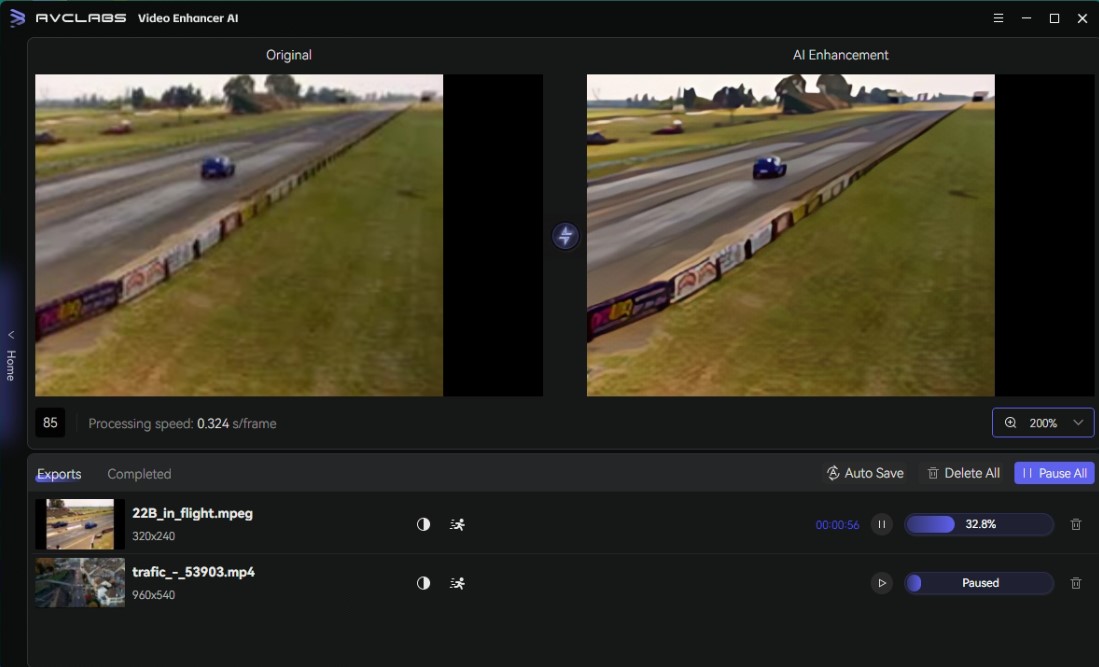
After setting everything up, click on the "Start Processing" button to start rendering your video. The program will start processing frames of your source video and assembling the upscaled video. During processing, you can click the Home button on the left of the screen and return to the main interface for adding more videos.
After the conversion is completed, you can click on the "Open Output Video" button to check the output video.
Conclusion:
That's all. Hope this guide on how to fix bad quality videos will help you to resolve the issues you have met and make such videos play smoothly again on your mobile phone, computer, or TV. Now you can enjoy back the comfortable video experience you want.
Try AVCLabs Video Enhancer AI to breathe new life into your footage!
 Highly Recommended
Any Video Converter Ultimate
Any Video Converter Ultimate is simply the best choice for your video conversion needs because it supports all the major file formats and featured as a video screen recorder, video editor, DVD ripper, and YouTube downloader.
Learn More
Related Articles & Tips
- • How to Fix The Quality of A Video
- • Top 3 Best AI Video Upscaling Software to Upscale Videos up to 1080p, 4K, 8K
- • Upscale Videos from SD to HD
- • How to Deinterlace Videos on Mac without Quality Loss
- • How Will AI Enhance Surveillance Video Quality
- • How to Fix Instagram Story Video Blurry Problem
- • Restore Old Home Movies to HD
- • How to Remove Noise from Your Footage
- • How to Upscale Videos from HD to 4K
- • 5 Best AI Video Enhancer Software in 2023
- • Top 10 Best Old Video Restoring Software 2023
 Video Converter
- MP4 Converters
- MKV to MP4 Converters
- AVI To MP4 Converters
- MOV to MP4 Converter
- Best Free AV1 Converters
- HEVC/H.265 Converter
- H.264 Video Converter
- Android Video Converter
- Samsung Video Converter
- Sony PS4 Video Converter
- Nokia Video Converter
- MPEG Video Converter
- Convert 4K to 1080P
- Convert MP4 to MP3
- Convert M2TS to MP4
- Convert MVI to MP4
- Convert WebM to MP4
- Convert Videos to MP3
- Convert MP4 to 3GP
- Convert M4V to MP4
 DVD Converter
 Video Editor
- Best AI Video Editors
- Free AI Video Generators
- Best AI Slideshow Makers
- Replace Face in Video
- AI Cartoon Video Generators
- Text-to-Video AI Generators
- Best Free Voice Changers
- Text-to-Video AI Generators
- Sites to Download Subtitles
- Add Subtitles to Video
- Free Online Video Compressor
- Convert Your Videos to GIFs
- Blur Video Backgrounds
- Video Editing Apps for YouTube
 Video Enhancer
- Best 10 Video Enhancer
- Improve Video Quality
- Fix Blurry Videos
- Remove Noise from Footage
- Upscale Video from HD to 4K
- Upscale Video from 480P to 1080P
- Best AI Video Upscaling Tools
- Make a Blurry Video Clear
- Best Old Video Restorer
- How to Sharpen Video
- Fix Bad Quality Videos
- Increase Video Resolution
- Convert Videos to 4K
- Upscale Anime Videos to 4K
 Photo Enhancer
- Fix Blurry Pictures Online
- Make Blurrys Picture Clear
- Increase Image Resolution Online
- Remove Blur from Images
- AI Image Sharpener Online
- Topaz Gigapixel AI Alternatives
- Fix Low-resolution Photos
- Colorize Historical Photos
- Remove Noise from Photos
- AI Image Sharpener
- AI Face Retoucher
- AI Image Enlargers
 Mobile & PC


